Nut-Free Pesto Recipe – Delicious & Easy Flavor
Nut Free Pesto is a revelation for anyone who loves that vibrant, herbaceous flavor but has to steer clear of nuts. I’ve always adored the punchy, fresh taste of traditional pesto, that gorgeous green swirl that transforms pasta, chicken, and even a simple sandwich into something extraordinary. But for so long, it felt like a treat I couldn’t fully enjoy, or one I had to meticulously check labels for. That’s where this incredible nut free pesto comes in. It’s a game-changer, proving that you don’t need pine nuts to achieve that authentic, addictive pesto perfection. This version is packed with all the basil goodness, garlic zing, and cheesy deliciousness you crave, making it a go-to for gatherings, quick weeknight dinners, or anytime you want a burst of sunshine on your plate.
Why You’ll Love This Nut Free Pesto
A Flavorful Alternative for Everyone
What truly makes this nut free pesto special is its inclusivity. It opens up a world of delicious possibilities for those with nut allergies, making a beloved sauce accessible to more people than ever before. Forget compromise; this recipe delivers on pure, unadulterated pesto flavor. It’s remarkably easy to whip up, too, meaning you can have a jar of this liquid gold ready to go whenever inspiration strikes. Prepare to fall in love with pesto all over again, guilt-free and bursting with flavor!
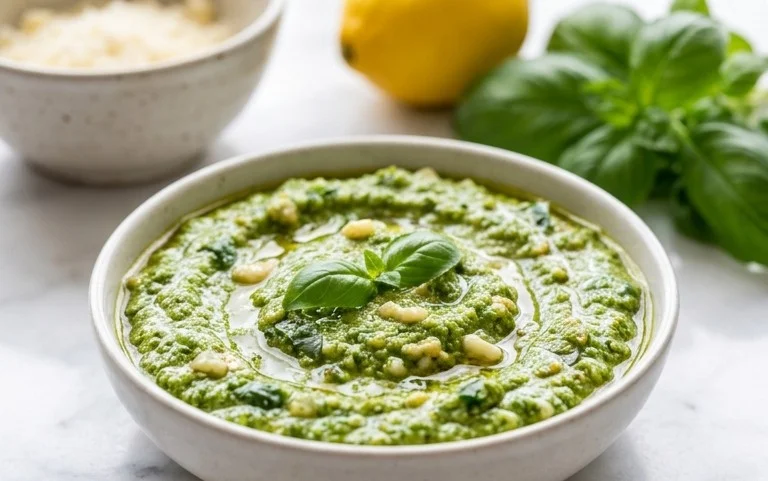
Nut Free Pesto
Welcome to a recipe that’s about to become your new go-to for a burst of fresh, vibrant flavor, all without a single nut! Traditional pesto is wonderful, but for those with nut allergies or simply looking for a delicious alternative, this nut-free version is a revelation. It’s incredibly versatile, perfect for pasta, as a spread on sandwiches, a dip for vegetables, or even dolloped onto grilled chicken or fish. Making your own pesto is surprisingly simple and incredibly rewarding, allowing you to control the quality of ingredients and customize the flavor to your liking. This recipe focuses on classic, bright tastes, delivering all the aromatic goodness of basil and garlic, balanced beautifully with savory Parmesan and rich olive oil. Get ready to impress yourself (and anyone you share it with!) with this delightfully nut-free creation.
Ingredients:
Crafting Your Nut Free Pesto
This recipe is designed to be straightforward, yielding a vibrant and flavorful pesto in just a few minutes. The key to a fantastic pesto is using the freshest ingredients you can find. For the basil, aim for bright green, fragrant leaves. If you can, pick them yourself or choose bunches that look lively and haven’t wilted. Garlic can be adjusted to your preference; start with two cloves, but if you’re a garlic lover, feel free to add another! The Parmesan cheese should be freshly grated for the best texture and flavor. Pre-grated cheese often contains anti-caking agents that can affect the final consistency. Olive oil quality matters here too; a good extra virgin extract olive oil will impart a wonderful fruity note.
Step 1: Prepare the Basil
Start by thoroughly washing your fresh basil leaves. Even if they look clean, it’s always a good idea to give them a gentle rinse under cool water to remove any dust or debris. After washing, it’s crucial to dry them completely. You can do this by gently patting them dry with paper towels or using a salad spinner for efficiency. Excess water can dilute the flavor of your pesto and affect its texture, making it watery rather than a rich paste. Once dried, give the basil a rough chop. This isn’t strictly necessary if you’re using a food processor, but it can help the blades catch the leaves more easily, especially in a smaller processor.
Step 2: Combine the Aromatics
Next, we’ll introduce the garlic. Peel your garlic cloves. If your garlic is particularly pungent or you prefer a milder garlic flavor, you can lightly sauté the cloves in a dry pan for a minute or two to mellow their bite. However, for a classic, sharp pesto flavor, raw garlic is perfect. Add the peeled garlic cloves to your food processor. If you’re using a mortar and pestle, which is the most traditional method and can yield a wonderfully nuanced pesto, start by pounding the garlic with a pinch of salt until it forms a paste.
Step 3: Pulse and Blend
Now, it’s time to bring everything together in the food processor. Add the prepared basil leaves on top of the garlic. Pulse the food processor a few times to start breaking down the ingredients. You want to achieve a coarse chop at this stage before you add the other ingredients. Don’t over-process at this point; we’re aiming for controlled reduction, not a smooth puree just yet. This initial pulsing helps to create space for the other ingredients to be incorporated evenly.
Step 4: Incorporate the Cheese and Seasoning
Once the basil and garlic have been pulsed into smaller pieces, it’s time to add the grated Parmesan cheese. Sprinkle it evenly over the mixture in the food processor. Then, add your salt and pepper. The salt will not only enhance the flavors but also help to break down the basil leaves further. Pulse again a few times until the cheese is incorporated. At this stage, the mixture will start to look more like pesto, though it will likely be quite thick and perhaps a bit crum extractbly.
Step 5: Emulsify with Olive Oil
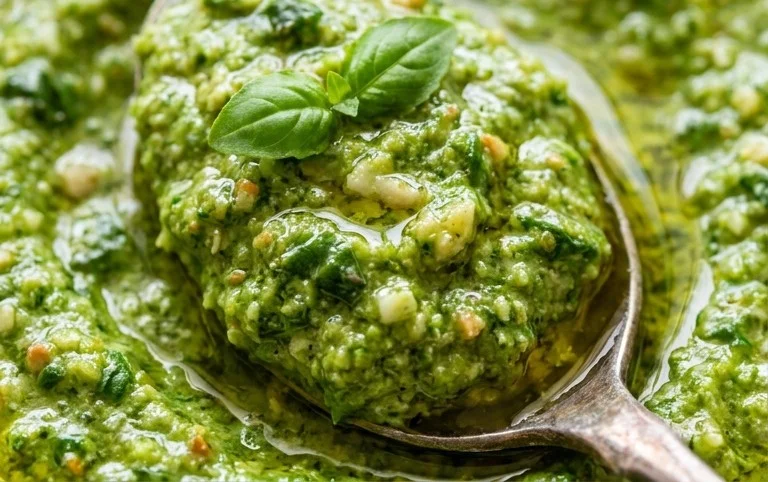
This is where the magic happens and your pesto transforms into a smooth, luscious sauce. With the food processor running on a low speed, slowly drizzle in the olive oil through the feed tube. Continue to process until the pesto reaches your desired consistency. Some people prefer a slightly chunkier pesto, while others like it incredibly smooth. If you want a thicker pesto, use a little less olive oil. If you prefer a thinner, more pourable pesto, you can add a touch more, or even a tablespoon of the pasta water if you’re serving it with pasta. Taste and adjust seasoning as needed. You might want a little more salt or a touch more pepper, depending on your palate.
Once blended, your nut-free pesto is ready to be enjoyed! Transfer it to an airtight container. For the best flavor, let it sit for at least 15-20 minutes before serving, allowing the flavors to meld. It can be stored in the refrigerator for up to a week, or frozen for longer storage. Enjoy this vibrant, flavorful, and allergy-friendly addition to your culinary repertoire!
Conclusion:
I hope you’ve enjoyed learning how to make this delicious nut-free pesto! This recipe is fantastic because it opens up a world of vibrant, herbaceous flavor for everyone, especially those with nut allergies. It’s incredibly versatile, allowing you to enjoy the classic taste of pesto without any worries. I encourage you to give this nut-free pesto a try – you’ll be amazed at how easy it is to whip up and how delicious it tastes.
Whether you’re tossing it with pasta, spreading it on sandwiches, or using it as a dip, this nut-free pesto is sure to become a staple in your kitchen. Don’t be afraid to experiment with the fresh herbs and ingredients you have on hand. The beauty of homemade pesto is its adaptability! So grab your basil, garlic, and other ingredients, and get ready to create something truly special.
Frequently Asked Questions:
Can I freeze this nut-free pesto?
Absolutely! This nut-free pesto freezes beautifully. I recommend portioning it into ice cube trays, freezing until solid, and then transferring the cubes to a freezer-safe bag or container. This makes it super convenient to thaw out just the amount you need for a quick meal.
What can I use instead of pine nuts for texture?
If you’re looking for a bit of texture, sunflower seeds or pepitas (pumpkin seeds) are excellent nut-free alternatives. Toasting them lightly beforehand will enhance their flavor and add a lovely crunch to your pesto.
How long does nut-free pesto last in the refrigerator?
When stored properly in an airtight container in the refrigerator, your nut-free pesto should stay fresh for about 5-7 days. Adding a thin layer of olive oil on top before sealing can help preserve its freshness even longer.
Nut-Free Pesto
A delicious and classic pesto recipe made without nuts, perfect for those with allergies.
Ingredients
-
2 cups fresh basil
-
2 garlic cloves
-
1/2 cup freshly grated Parmesan cheese
-
1/4 cup olive oil
-
1/4 teaspoon salt
-
1/8 teaspoon pepper
Instructions
-
Step 1
Wash and thoroughly dry the fresh basil leaves. -
Step 2
Peel and roughly chop the garlic cloves. -
Step 3
In a food processor, combine the basil, garlic, Parmesan cheese, salt, and pepper. -
Step 4
Pulse the ingredients until finely chopped. -
Step 5
With the food processor running, slowly drizzle in the olive oil until the pesto is smooth and well combined. -
Step 6
Taste and adjust seasoning if necessary. Serve immediately or store in an airtight container in the refrigerator.
Important Information
Nutrition Facts (Per Serving)
It is important to consider this information as approximate and not to use it as definitive health advice.
Allergy Information
Please check ingredients for potential allergens and consult a health professional if in doubt.