Crispy Chicken Caesar Sandwich-Best Recipe
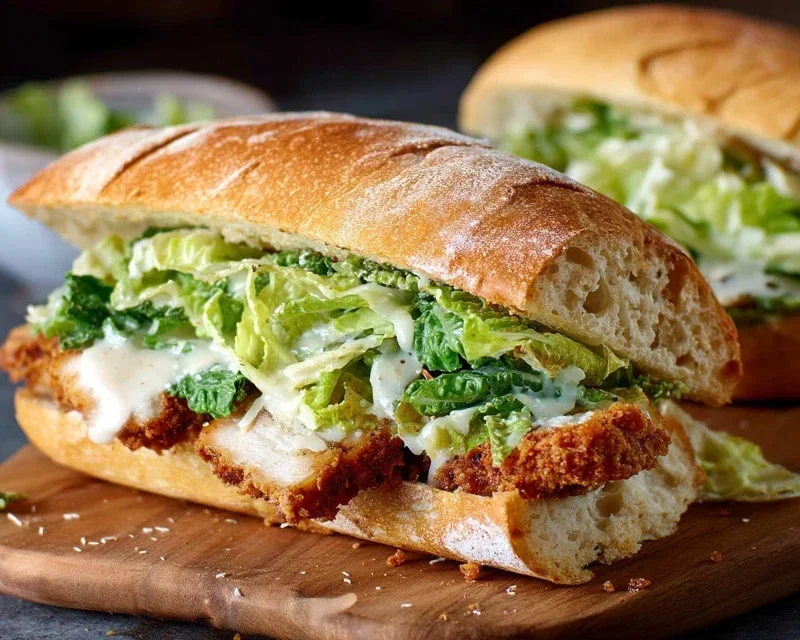
Crispy Chicken Caesar Sandwich perfection is closer than you think! We all have those go-to comfort foods, and for many of us, the classic Caesar salad holds a special place in our hearts. But what happens when you take those beloved, tangy, creamy flavors and elevate them into a handheld masterpiece? You get the Crispy Chicken Caesar Sandwich, a dish that’s both familiar and excitingly new. People adore this sandwich because it delivers all the savory satisfaction of a perfectly seasoned, crunchy piece of chicken, beautifully complemented by the zesty embrace of Caesar dressing, the crisp bite of romaine lettuce, and the essential Parmesan cheese. What makes this particular Crispy Chicken Caesar Sandwich so special is the delicate balance of textures and tastes – the golden-brown crust giving way to tender, juicy chicken, all piled high on a toasted bun that can actually hold up to the delicious mess. It’s a symphony for your taste buds, a truly irresistible lunch or dinner option.

Crispy Chicken Caesar Sandwich
This Crispy Chicken Caesar Sandwich is a delightful twist on a classic, elevating the humble sandwich into a gourmet experience. Imagin extracte tender, juicy chicken cutlets, perfectly coated and fried to a golden crisp, then nestled between soft buns with a generous slathering of creamy, zesty Caesar dressing and a sprinkle of fresh Parmesan. It’s the ultimate comfort food, packed with bold flavors and satisfying textures. This recipe focuses on achieving that irresistible crunch without sacrificing the tender interior of the chicken, all while creating a homemade Caesar dressing that’s far superior to any store-bought version. Get ready to impress yourself and anyone lucky enough to share this delicious creation with you!
Ingredients:
Cooking Instructions:
First, let’s get our star player, the Caesar dressing, ready. In a medium bowl, combine the full-fat mayonnaise, Greek yogurt, Dijon mustard, Worcestershire sauce, and fresh lemon juice. The Greek yogurt adds a delightful tang and lightness while the mayonnaise provides richness. Dijon mustard brings a subtle sharpness, and the Worcestershire sauce deepens the umami flavor profile. Whisk these ingredients together until they are thoroughly combined and smooth. Next, add the freshly grated Parmesan cheese, minced garlic, ¼ teaspoon of black pepper, and a pinch of sea salt. Grating your Parmesan fresh will make a world of difference in terms of flavor and texture; pre-shredded cheese often contains anti-caking agents that can affect the consistency of your dressing. Stir everything together until the cheese is well incorporated. Taste the dressing and adjust seasonings if necessary. You might want a little more lemon juice for brightness, or a touch more salt and pepper to enhance the flavors. This dressing is incredibly versatile and can also be used as a dip for vegetables or as a dressing for a traditional Caesar salad. Cover the bowl and refrigerate for at least 30 minutes to allow the flavors to meld beautifully. This resting period is crucial for developing a truly remarkable dressing.
Now, let’s prepare the chicken cutlets for their crispy transformation. If your chicken cutlets are on the thicker side, you can gently pound them to an even thickness between two sheets of plastic wrap or parchment paper. This ensures they cook evenly and quickly. Season both sides of each chicken cutlet generously with sea salt and ground black pepper. Don’t be shy with the seasoning; this is your base flavor for the chicken itself. In a shallow dish or pie plate, place the all-purpose flour and ½ teaspoon of salt. Whisk them together to ensure the salt is evenly distributed throughout the flour. This flour mixture will act as the initial coating to help the subsequent breading adhere.
Next, we move on to the breading station, which is key to achieving that perfect crunch. You’ll need two more shallow dishes. In the first dish, whisk one or two eggs until they are well beaten. This will be your “egg wash.” In the second dish, place your breadcrum extractbs. While the recipe doesn’t specify breadcrum extractbs, panko breadcrum extractbs are highly recommended for their superior crispiness. If you don’t have panko, regular breadcrum extractbs will also work, but you might achieve a slightly less airy crunch. Ensure your breadcrum extractbs are seasoned with salt and pepper if they aren’t already. We will skip the flour dredge here for a lighter, crispier coating. Dip each seasoned chicken cutlet into the egg wash, ensuring it’s fully coated on both sides. Let any excess egg drip off. Then, immediately transfer the egg-washed cutlet to the breadcrum extractbs and press down firmly to ensure a thick, even coating. You want the breadcrum extractbs to adhere well. It’s important to work relatively quickly here so the egg wash doesn’t get too watery, which can make the breadcrum extractbs clump. Repeat this process for all five chicken cutlets.
Heating the oil is a critical step for frying. In a large, heavy-bottomed skillet or Dutch oven, add enough oil to come about ½ inch up the sides of the pan. The type of oil you use can affect the flavor; a neutral oil like vegetable oil, canola oil, or peanut oil is generally best for frying as it has a high smoke point and won’t impart too much flavor. Heat the oil over medium-high heat until it reaches approximately 350°F (175°C). If you don’t have a thermometer, you can test the oil by dropping a tiny pinch of breadcrum extractbs into it. They should sizzle immediately and float to the surface. If they brown too quickly, the oil is too hot; if they barely sizzle, it’s not hot enough. Maintaining the correct oil temperature is crucial for achieving perfectly crispy chicken without it becoming greasy or burnt.
Carefully place the breaded chicken cutlets into the hot oil, being sure not to overcrowd the pan. Overcrowding will lower the oil temperature, leading to soggy chicken. You may need to fry the chicken in batches. Fry the chicken for about 3-5 minutes per side, or until it’s golden brown and cooked through. The internal temperature of the chicken should reach 165°F (74°C). Use a meat thermometer to check for doneness. Once cooked, remove the chicken from the skillet and place it on a wire rack set over a baking sheet or paper towels to drain any excess oil. This allows air to circulate around the chicken, maintaining its crispiness. While the chicken is still hot, you can lightly sprinkle it with a little extra sea salt and ground black pepper if desired.
Finally, assemble your masterpiece! Lightly toast your sandwich buns if you prefer. Spread a generous amount of your homemade Caesar dressing on both halves of the bun. Place a crispy chicken cutlet on the bottom bun. If you’re using them, add some crisp lettuce leaves and a few slices of ripe tomato for added freshness and texture. Crown it with the top bun. Serve immediately and enjoy the incredible crunch and explosion of flavors! This sandwich is best enjoyed fresh, so don’t let those perfectly fried cutlets sit around for too long.
Note 1: Chicken cutlets are thin, boneless, skinless chicken breasts. If you can’t find them pre-cut, you can easily make them by slicing larger chicken breasts horizontally.
Conclusion:
There you have it – a foolproof guide to creating the ultimate Crispy Chicken Caesar Sandwich! This recipe is a winner because it delivers that satisfying crunch from perfectly fried chicken, the tangy zest of a homemade Caesar dressing, and the fresh bite of crisp romaine, all nestled between toasted buns. It’s a delightful twist on a classic salad that’s substantial enough for a satisfying meal.
For serving, I love pairing this sandwich with a side of sweet potato fries or a light, vibrant coleslaw. You can also serve it alongside a cup of tomato soup for a comforting combination. If you’re feeling adventurous with variations, consider adding a sprinkle of crispy beef bacon bits for extra smoky flavor, or swap out the chicken for pan-seared halloumi cheese for a vegetarian option. Don’t be afraid to experiment with different types of bread too – a ciabatta roll or sourdough can offer a fantastic textural contrast.
I truly hope you give this Crispy Chicken Caesar Sandwich a try. It’s incredibly rewarding to create such a delicious and impressive sandwich right in your own kitchen. Let me know how it turns out!
Frequently Asked Questions:
How can I make the chicken extra crispy?
For maximum crispiness, ensure your chicken cutlets are thinly pounded to an even thickness. Then, double-dip them in the flour and egg mixture before coating them in your seasoned breadcrum extractbs or panko. Frying at the correct oil temperature (around 350°F or 175°C) is also key; too low and the chicken will absorb oil and become soggy, too high and it will burn before cooking through.
Can I prepare any components ahead of time?
Absolutely! The Caesar dressing can be made up to 3 days in advance and stored in an airtight container in the refrigerator. You can also bread the chicken and refrigerate it for a few hours before frying, though it’s best to fry it just before assembling the sandwiches for optimal crispness.
What if I don’t want to fry the chicken?
You can achieve a delicious crispy chicken Caesar sandwich without frying! Try baking your breaded chicken cutlets at 400°F (200°C) for about 20-25 minutes, flipping halfway through, until golden brown and cooked through. Alternatively, air-frying is another excellent option for a healthier, crispy result.
Crispy Chicken Caesar Sandwich
A delicious and crispy chicken sandwich with a homemade Caesar dressing, perfect for a quick lunch or dinner.
Ingredients
-
½ cup full-fat mayonnaise
-
3 tbsp Greek yogurt
-
1 tsp Dijon mustard
-
1 tsp Worcestershire sauce
-
2 tbsp lemon juice
-
¼ cup Parmesan cheese (freshly grated)
-
1-2 garlic cloves (minced)
-
¼ tsp black pepper
-
Pinch sea salt
-
5 chicken cutlets
-
sea salt (to taste)
-
ground black pepper (to taste)
-
Oil (for frying)
-
⅓ cup all-purpose flour
-
½ tsp salt
Instructions
-
Step 1
In a bowl, whisk together mayonnaise, Greek yogurt, Dijon mustard, Worcestershire sauce, lemon juice, grated Parmesan cheese, minced garlic, black pepper, and a pinch of sea salt to make the Caesar dressing. Set aside. -
Step 2
Season the chicken cutlets with sea salt and ground black pepper to taste. -
Step 3
In a shallow dish, combine all-purpose flour with ½ tsp salt. Dredge each chicken cutlet in the seasoned flour, ensuring it’s evenly coated. -
Step 4
Heat oil in a large skillet over medium-high heat. Fry the floured chicken cutlets for about 4-5 minutes per side, or until golden brown and cooked through. -
Step 5
Remove chicken from skillet and let drain on a paper towel-lined plate. -
Step 6
Assemble the sandwiches: spread a generous amount of Caesar dressing on your preferred bread, place a crispy chicken cutlet on top, and add more dressing if desired.
Important Information
Nutrition Facts (Per Serving)
It is important to consider this information as approximate and not to use it as definitive health advice.
Allergy Information
Please check ingredients for potential allergens and consult a health professional if in doubt.