Perfect Ramen Eggs Ajitama Flavorful Marinated Delights
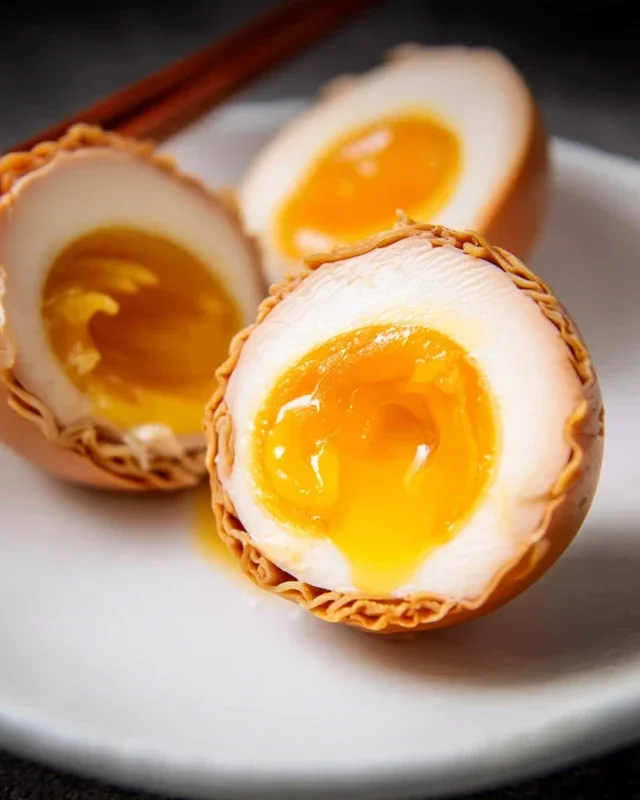
Ramen eggs, also known as Ajitama, are the unsung heroes of any truly spectacular bowl of ramen. That perfect, jammy yolk, infused with savory soy sauce and a hint of sweetness, is what elevates a good ramen to an unforgettable culinary experience. These marinated soft-boiled eggs are so much more than just a topping; they’re a flavor bomb, a textural delight, and frankly, addictive. I find myself craving their rich, umami-packed goodness long after the last slurp of noodles. What makes these ramen eggs so special is the alchemy that happens during the marination process. Simple ingredients transform into something truly magical, creating a custardy center that melts in your mouth. They’re surprisingly easy to make at home, and once you taste your own perfectly seasoned Ajitama, you’ll wonder how you ever enjoyed ramen without them. Get ready to discover how to create these irresistible marinated delights.
Ramen Eggs (Ajitama)
There’s something truly magical about a perfectly cooked ramen egg, also known as ajitama. That soft, custardy yolk, infused with a savory and slightly sweet marinade, transforms a humble bowl of noodles into a culinary masterpiece. Forget those chalky, overcooked eggs you might have encountered; these ajitama are all about that glorious jammy center. Making them at home is surprisingly straightforward, and the payoff is immense. Once you master this simple technique, you’ll find yourself adding these flavor bombs to more than just ramen – think rice bowls, salads, or even just as a standalone snack. Let’s get started on creating these little pockets of deliciousness.
Ingredients:
Preparing the Eggs
The foundation of a great ajitama is the perfectly boiled egg. We’re aiming for a soft, jammy yolk, and the key to achieving this is precise timing and temperature control.
Boiling the Eggs
1. Bring a medium saucepan of water to a rolling boil. If you’re using vinegar, you can add a splash (about 1 teaspoon) to the boiling water. This is an old trick that some believe helps prevent egg whites from spreading too much if a shell cracks during cooking, though it’s not strictly necessary.
2. Gently lower the eggs into the boiling water using a slotted spoon or spider strainer. Be careful not to drop them, as this can cause them to crack. The water should immediately return to a gentle boil once the eggs are in.
3. Once the water is boiling again, set a timer for exactly 6 minutes and 30 seconds for a perfectly jammy yolk. If you prefer a slightly firmer, but still molten, yolk, you can go up to 7 minutes. For a fully cooked, but still tender, yolk, aim for 8 minutes. Anything over 9 minutes will likely result in a hard-boiled yolk, which isn’t ideal for ajitama.
4. As soon as the timer goes off, immediately transfer the eggs from the boiling water to an ice bath. This is a crucial step to stop the cooking process instantly and prevent the yolks from overcooking. Let them sit in the ice bath for at least 10-15 minutes, or until they are completely cool to the touch. This also helps make them easier to peel.
Marinating the Eggs
While the eggs are chilling, it’s time to prepare the flavorful marinade that will infuse them with that signature ajitama taste.
Crafting the Marinade
1. In a small saucepan, combine the light sodium soy sauce, water, non-non-non-alcoholic alternativeic non-alcoholic mirin, and granulated sugar.
2. Place the saucepan over medium heat and stir gently until the sugar has completely dissolved. You don’t need to bring this mixture to a boil; just ensure everything is well combined and the sugar is gone. This creates a balanced sweet and savory base for our marinade.
3. Remove the saucepan from the heat and let the marinade cool down completely. You can speed this up by placing the saucepan in a bowl of ice water. It’s important that the marinade is cool before you add the eggs, otherwise, the residual heat will continue to cook them and you’ll lose that perfect jammy yolk.
Peeling and Marinating
With the eggs cooled and the marinade ready, we move on to the final steps.
Peeling and Marinating
1. Once the eggs are thoroughly chilled, it’s time to peel them. Gently tap each egg on a hard surface to crack the shell all over. Then, carefully peel the shells away, starting from the wider end where the air pocket is usually located. If you’ve cooked them properly and chilled them well, the shells should slip off relatively easily. If you encounter any stubborn bits, you can peel them under cool running water.
2. Place the peeled eggs into a resealable bag or a small, airtight container.
3. Pour the cooled marinade over the eggs, ensuring that they are completely submerged. If your container is not large enough for them to be fully submerged, you can top it off with a little more water or soy sauce to ensure even marination.
4. Seal the bag or container and refrigerate for at least 4 hours, but ideally for 12-24 hours. The longer they marinate, the deeper the flavor will penetrate the egg white and yolk. You can turn them gently every few hours to ensure even coloring and flavor distribution.
Enjoying Your Ajitama
Your ramen eggs are now ready to be enjoyed! They will have a beautiful, slightly amber hue from the marinade and will be incredibly flavorful.
Serving Suggestions
When you’re ready to serve, carefully remove the ajitama from the marinade. You can slice them in half lengthwise to showcase that glorious jammy yolk, or add them whole to your ramen. The marinade itself is also delicious and can be used as a finishing sauce for other dishes. Store any leftover ajitama in the marinade in the refrigerator for up to 3 days. Enjoy the fruits of your labor – these homemade ramen eggs are a game-changer!
*Note on eggs: The freshness of your eggs can affect how easily they peel. Slightly older eggs (a week or so old) tend to peel more readily than very fresh ones.

Conclusion:
And there you have it – your perfectly jammy, savory Ramen Eggs, also known as Ajitama! I hope you’ve enjoyed learning how simple yet incredibly rewarding it is to make these flavorful additions. These eggs are truly a game-changer for any noodle dish, offering a burst of umami and a delightful texture that elevates your ramen experience from good to absolutely phenomenal. They’re not just for ramen, though; think of them atop rice bowls, in salads, or even as a sophisticated snack. Don’t be afraid to get creative with your marinade! Some popular variations include adding a splash of non-alcoholic mirin for sweetness, a bit of non-alcoholic sake for depth, or even a pinch of gochugaru for a gentle kick. I truly encourage you to try this recipe. It’s a fantastic way to add a restaurant-quality touch to your home cooking with minimal effort. So go ahead, crack those eggs, and savor the deliciousness!
Frequently Asked Questions:
Can I make Ramen Eggs ahead of time?
Absolutely! Ramen Eggs are fantastic for meal prep. You can store them in an airtight container in the refrigerator for up to 3-4 days. The longer they marinate, the deeper the flavor will become.
What’s the best way to peel the eggs?
The key to easy peeling is the ice bath. Immediately transferring the boiled eggs to a bowl of ice water stops the cooking process and causes the egg white to contract slightly, pulling away from the shell. Peeling them under cool running water can also help.
Can I use different types of soy sauce for the marinade?
Yes! While regular soy sauce is a great base, you can experiment with tamari for a gluten-free option, or even a darker soy sauce for a richer color and more intense flavor. Just be mindful of the saltiness.
Ramen Eggs (Ajitama)
Perfectly marinated soft-boiled eggs for ramen, with a custardy yolk and savory flavor.
Ingredients
-
6 large eggs
-
1/2 cup soy sauce (light sodium)
-
1/4 cup water
-
1/4 cup non-alcoholic mirin
-
2 tablespoons granulated sugar
-
1 tablespoon rice vinegar (optional for boiling)
Instructions
-
Step 1
Gently place eggs in a pot and cover with cold water. Add rice vinegar if using. Bring to a rolling boil. -
Step 2
Once boiling, immediately reduce heat to a simmer and cook for exactly 6 minutes for a jammy yolk, or 7 minutes for a firmer yolk. -
Step 3
Prepare an ice bath. Carefully transfer the cooked eggs to the ice bath to stop the cooking process. Let them chill for at least 5 minutes. -
Step 4
In a small bowl, whisk together soy sauce, water, non-alcoholic mirin, and granulated sugar until the sugar is dissolved. -
Step 5
Gently peel the cooled eggs. -
Step 6
Place the peeled eggs in a resealable bag or container. Pour the marinade over the eggs, ensuring they are fully submerged. Marinate in the refrigerator for at least 6 hours, or preferably overnight. -
Step 7
Remove eggs from marinade, slice in half lengthwise, and serve.
Important Information
Nutrition Facts (Per Serving)
It is important to consider this information as approximate and not to use it as definitive health advice.
Allergy Information
Please check ingredients for potential allergens and consult a health professional if in doubt.