Red White Blue Cheesecake Strawberries Recipe
Red, White, and Blue Cheesecake Strawberries are the ultimate showstopper for any summer celebration or patriotic gathering. Imagin extracte vibrant, juicy strawberries bursting with a creamy, tangy cheesecake filling, all nestled in a sweet, crunchy shell. This delightful dessert is incredibly popular for so many reasons. It’s visually stunning, naturally gluten-free, and offers a perfect balance of sweet and tart flavors that dance on your palate. What truly makes these Red, White, and Blue Cheesecake Strawberries special is their effortless elegance. They look like they came straight from a professional bakery, yet they’re surprisingly simple to assemble, making them a stress-free addition to your party spread. Plus, who can resist the irresistible combination of fresh fruit and luscious cheesecake? Get ready to wow your guests with this utterly delightful treat!
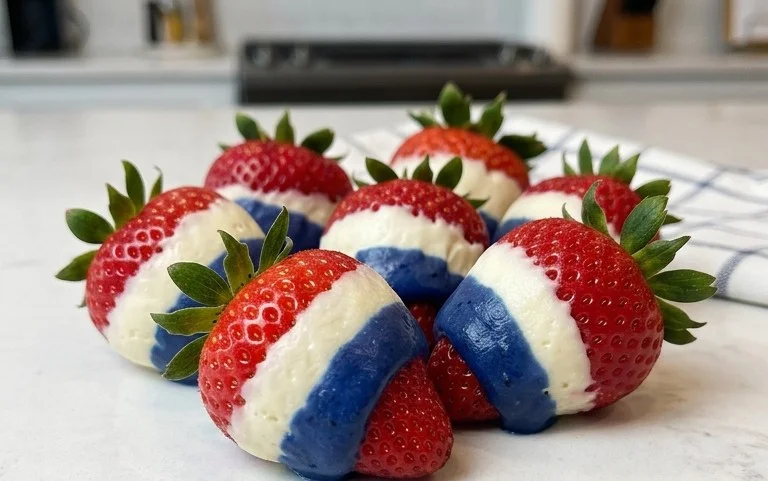
Red, White, and Blue Cheesecake Strawberries
These Red, White, and Blue Cheesecake Strawberries are the perfect patriotic treat, bursting with festive flavor and incredibly easy to make. They’re a delightful no-bake dessert that’s sure to impress at any summer gathering, Fourth of July celebration, or just when you’re craving something sweet and spectacular. The creamy, tangy cheesecake filling, nestled within sweet strawberries and topped with vibrant blueberries, creates a symphony of textures and tastes that’s utterly irresistible.
Ingredients:
Instructions:
Preparing the Cheesecake Filling
Our first step is to create the luscious cheesecake filling. This is where the magic happens, transforming simple ingredients into a decadent spread. Make sure your cream cheese is truly softened. This means leaving it out at room temperature for about an hour, or gently warming it in the microwave for short bursts (10-15 seconds at a time) until it’s pliable but not melted. Softened cream cheese is crucial for achieving a smooth, lump-free filling. If you skip this step, you’ll likely end up with a grainy texture, which is less than ideal for our creamy delight.
In a medium mixing bowl, combine the softened cream cheese and the confectioners’ sugar. Using an electric mixer on medium speed, beat these two ingredients together until they are completely smooth and well incorporated. You’re aiming for a homogenous mixture where you can no longer see any streaks of cream cheese or pockets of powdered sugar. Scrape down the sides of the bowl a few times during this process to ensure everything is evenly mixed. This forms the base of our cheesecake flavor, providing that signature tang and sweetness.
Next, we’ll gently fold in the thawed whipped topping. It’s important that your whipped topping is fully thawed but not deflated. If it’s still frozen, the filling won’t be as light and airy. If it’s been thawed for too long and seems watery, you might want to drain off any excess liquid. Add the whipped topping to the cream cheese mixture. Now, switch to a spatula or a wooden spoon for this step. Gently fold the whipped topping into the cream cheese mixture until just combined. Overmixing at this stage can deflate the whipped topping, making your filling less fluffy. We want to maintain that airy texture. The result should be a light, creamy, and smooth filling.
Finally, we’ll add the almond extract. This little touch adds a subtle yet distinct flavor that pairs beautifully with both strawberries and cream. Stir it in gently until it’s evenly distributed throughout the filling. Taste a tiny bit of the filling at this point (if you can resist!). You can adjust the sweetness or almond flavor slightly if you wish, but remember it will be even more delightful when paired with the fresh fruit.
Assembling the Strawberries
Now it’s time to prepare our beautiful strawberry vessels. Select 12 large, ripe strawberries. Gently wash them under cool running water and pat them completely dry with paper towels. It’s important that they are dry so the cheesecake filling adheres well. Once dry, carefully slice each strawberry in half lengthwise. You’re looking for halves that have a relatively flat surface to hold the filling. Remove the green hull from each half.
Arrange the strawberry halves on a serving platter or a baking sheet lined with parchment paper. Make sure they are cut-side up. This flat surface is where we will carefully spoon our delicious cheesecake filling. You want to create a nice, even surface for the filling, so try to make your cuts as consistent as possible.
Filling and Decorating
This is the fun part where we bring our Red, White, and Blue theme to life! Using a small spoon or a piping bag fitted with a plain tip, carefully fill each strawberry half with a generous dollop of the cheesecake mixture. Don’t be shy; we want a substantial amount of that creamy goodness! If you’re using a spoon, try to create a neat little mound on top of each strawberry half. If you’re using a piping bag, you can create a more uniform and elegant presentation. The goal is to have a beautiful, creamy top to each strawberry.
Once all the strawberry halves are filled, it’s time for the ‘blue’ in our patriotic trio. Take your 36 blueberries. These are the jewels that will crown our creations. Gently place three blueberries on top of the cheesecake filling on each strawberry half. Arrange them in a visually appealing way – perhaps in a small cluster or a little triangle. The vibrant blue of the blueberries against the white filling and the red of the strawberry creates that stunning patriotic effect. They add a burst of fresh, slightly tart flavor that complements the sweet and creamy filling perfectly. Admire your handiwork; they should look absolutely delightful!
Chilling and Serving
To ensure the best flavor and texture, it’s important to let these beauties chill. Cover the platter or baking sheet loosely with plastic wrap. Refrigerate the Red, White, and Blue Cheesecake Strawberries for at least 30 minutes before serving. This allows the cheesecake filling to firm up slightly, making it easier to eat and meld the flavors together. They can be made a few hours ahead of time, but it’s best to add the blueberries just before serving to keep them looking their freshest.
When you’re ready to serve, arrange them on your prettiest platter. These are a guaranteed hit, perfect for barbecues, picnics, or simply as a special treat to brighten your day. Enjoy the delightful combination of creamy, fruity, and sweet!
Conclusion:
My Red, White, and Blue Cheesecake Strawberries are truly a showstopper! They’re not only incredibly delicious, with the creamy cheesecake filling beautifully complementing the sweet, juicy strawberries, but they’re also a feast for the eyes. The vibrant colors make them the perfect dessert for any patriotic celebration, summer barbecue, or just when you want to add a little sparkle to your day. They’re surprisingly easy to assemble, making them accessible even for begin extractner bakers.
These delightful treats are incredibly versatile. Serve them chilled for a refreshing bite on a warm afternoon. They pair wonderfully with a light dusting of powdered sugar or a drizzle of white chocolate. For an extra festive touch, consider arrangin extractg them on a platter in a star pattern. Looking for a variation? You can easily switch up the fillings by adding a swirl of raspberry puree for a pink hue or incorporating a hint of lemon zest for added brightness. I truly encourage you to give these Red, White, and Blue Cheesecake Strawberries a try – you won’t be disappointed!
Frequently Asked Questions:
Can I make these cheesecake strawberries ahead of time?
Yes, absolutely! You can prepare the cheesecake filling and hull the strawberries a day in advance. Store them separately in airtight containers in the refrigerator. Assemble the strawberries with the filling just a few hours before serving to ensure the strawberries stay fresh and firm.
What if I don’t have a piping bag?
No worries at all! If you don’t have a piping bag and tips, you can simply use a small spoon to dollop the cheesecake filling into the hollowed-out strawberries. It might not be as neat as piped filling, but the taste will be just as amazing. You can also use a zip-top bag with a corner snipped off for a makeshift piping bag.
Are there any dairy-free options for the cheesecake filling?
While the classic recipe calls for cream cheese, you can achieve a delicious dairy-free version by using a good quality dairy-free cream cheese alternative and substituting the butter with a vegan butter spread. Ensure your grabeef ham cracker crum extractbs are also dairy-free. The texture and flavor will be slightly different but still very enjoyable.
Red, White, and Blue Cheesecake Strawberries
A festive and easy no-bake dessert featuring cheesecake-filled strawberries topped with blueberries.
Ingredients
-
1 (8-ounce) package cream cheese, softened
-
1/2 cup confectioners’ sugar
-
1 cup whipped topping, thawed
-
1/2 teaspoon almond extract
-
12 large strawberries, cut in half
-
36 blueberries
Instructions
-
Step 1
In a medium bowl, beat the softened cream cheese and confectioners’ sugar until smooth. -
Step 2
Gently fold in the thawed whipped topping and almond extract until well combined. -
Step 3
Carefully hollow out a small portion from the cut side of each strawberry half to create a well for the filling. -
Step 4
Spoon or pipe the cream cheese mixture into the hollowed-out strawberries. -
Step 5
Top each filled strawberry half with a few blueberries. -
Step 6
Arrange the cheesecake strawberries on a serving platter and chill for at least 15 minutes before serving.
Important Information
Nutrition Facts (Per Serving)
It is important to consider this information as approximate and not to use it as definitive health advice.
Allergy Information
Please check ingredients for potential allergens and consult a health professional if in doubt.