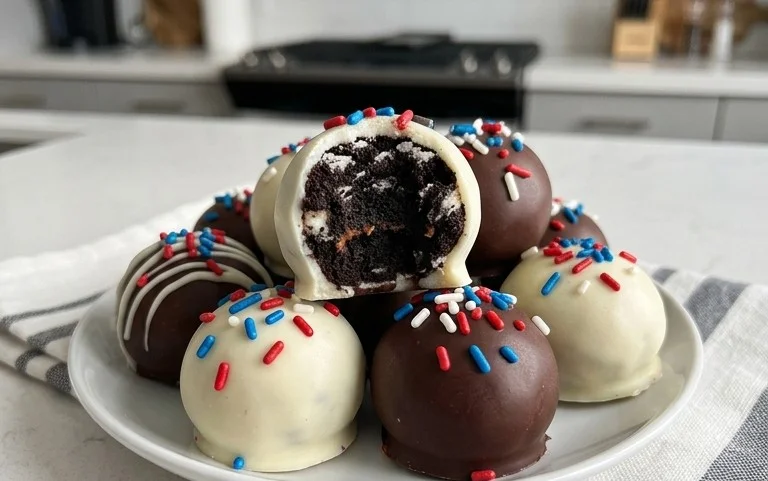
Patriotic Oreo Balls-Festive Dessert Recipe
Patriotic Oreo Balls are the ultimate no-bake treat for any celebration, and trust me, they’re going to be the star of your next gathering! There’s something undeniably fun and utterly delicious about these bite-sized wonders. They’re incredibly easy to make, which is a huge plus when you’re busy with party prep, and they consistently disappear from the dessert table in record time. What truly makes these Patriotic Oreo Balls so special is their versatility. You can customize them to match any holiday or theme, but for those red, white, and blue occasions, they’re simply show-stopping. Imagin extracte vibrant colors meeting that classic, irresistible Oreo flavor – it’s a match made in dessert heaven! Get ready to impress your friends and family with these easy, festive delights.
Patriotic Oreo Balls
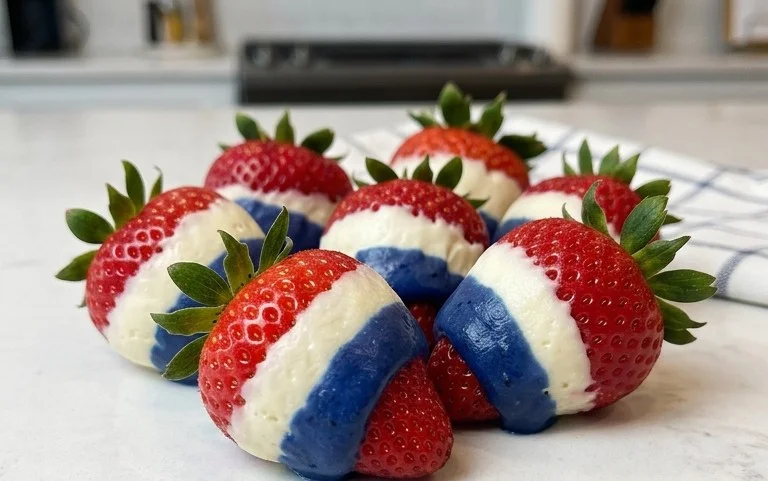
Get ready to celebrate any patriotic holiday with these incredibly easy and undeniably delicious Patriotic Oreo Balls! These no-bake treats are a guaranteed crowd-pleaser, perfect for Fourth of July picnics, Memorial Day gatherings, or even just a fun weekend project. The combination of rich, crushed Oreos and creamy cream cheese, all coated in vibrant red, white, and blue candy melts, creates a symphony of flavors and textures that will have everyone asking for the recipe. They’re simple enough for even the most novice bakers, making them an ideal activity to do with kids, or just a delightful way to indulge your sweet tooth. Let’s dive into making these festive delights!
Ingredients:
Preparation Steps:
The journey to these delectable Oreo Balls begin extracts with a few simple preparation steps. It’s crucial to have your ingredients ready and your workspace organized before you start mixing. Softening the cream cheese is key; it should be spreadable but not completely melted. This will ensure it incorporates smoothly with the crushed Oreos, creating a cohesive dough. Taking the time to soften the cream cheese properly will prevent any lumps in your final mixture, leading to a more enjoyable texture.
1. Crushing the Oreos: The foundation of our Oreo Balls is, of course, the Oreos themselves. You’ll want to crush the entire package of Oreo cookies. This is where the fun can really begin extract! You can use a food processor for a quick and uniform crum extractb. Pulse the Oreos until they are finely ground. If you don’t have a food processor, no worries! You can also place the Oreos in a large zip-top bag, seal it tightly, and then use a rolling pin to crush them into fine crum extractbs. It’s important to get them as fine as possible, as this will help them bind together with the cream cheese more effectively. You’re looking for a consistency that resembles damp sand. Don’t worry if there are a few tiny chunks; those add a little texture!
2. Mixing the Dough: Once your Oreos are perfectly crushed, it’s time to bring in the cream cheese. In a large mixing bowl, combine the finely crushed Oreo cookies with the softened cream cheese. Use a sturdy spatula or a wooden spoon to mix these two ingredients thoroughly. You want to ensure the cream cheese is completely incorporated into the cookie crum extractbs. This step is vital for achieving the right dough consistency. It might seem a little crum extractbly at first, but keep mixing. The mixture should start to come together into a dough that you can easily roll into balls. If the mixture feels too dry and won’t hold its shape, you can add a tiny bit more softened cream cheese, just a tablespoon at a time, until it becomes pliable. Conversely, if it feels too wet, you can add a few more crushed Oreos. The goal is a dough that holds together when squeezed.
3. Forming the Balls: Now comes the satisfying part: rolling the dough into balls! You can use a tablespoon or a small cookie scoop to portion out the dough for consistent sizing. Aim for balls that are about 1 inch in diameter. This size is perfect for dipping and provides a delightful bite-sized treat. Roll each portion of dough between your palms until it forms a smooth, compact ball. As you roll them, place them on a baking sheet lined with parchment paper or wax paper. The parchment paper prevents them from sticking and makes for easy cleanup. You should get a good number of balls from the entire package of Oreos and cream cheese, so ensure you have enough space on your baking sheets. Once all the dough is rolled into balls, place the entire baking sheet into the freezer for at least 15-20 minutes. This chilling step is crucial. It firm up the Oreo balls, making them much easier to dip in the melted candy and preventing them from losing their shape during the coating process.
4. Melting the Candy Melts: While your Oreo balls are chilling, it’s time to prepare your candy coatings. You’ll be working with red, blue, and white. To melt the candy melts and white melting wafers, you have a couple of options. The easiest and most common method is using a microwave. Place each color of candy melts (red, blue, and white melting wafers) in separate microwave-safe bowls. Heat them in the microwave in 30-second intervals, stirring well after each interval. Continue this process until the candy is smooth and completely melted. Be careful not to overheat the candy, as this can cause it to seize up and become unusable. Another effective method is using a double boiler. Fill the bottom pot with about an inch of water and bring it to a simmer. Place the candy melts in the top bowl, ensuring the bottom of the bowl does not touch the water. Stir continuously until smooth and melted. Having your melted candy ready and at the right consistency is key for a smooth coating.
Dipping and Decorating:
This is where your Patriotic Oreo Balls truly come to life! The vibrant colors and festive sprinkles will make these treats a showstopper.
5. Dipping and Decorating: Once the Oreo balls are firm from their time in the freezer, it’s time for the fun part – dipping! Take a chilled Oreo ball and carefully drop it into one of the melted candy colors. Use a fork or a dipping tool to ensure the entire ball is coated. Gently lift the ball out of the candy, letting any excess drip back into the bowl. You can scrape the bottom of the ball against the rim of the bowl to remove any excess coating. Place the dipped Oreo ball back onto the parchment-lined baking sheet. If you want to create a striped or swirled effect, you can dip the ball into one color, let it set slightly, and then drizzle or dip it into another color. For our patriotic theme, we’ll aim for solid red, blue, and white balls. Immediately after dipping each ball, while the candy coating is still wet, sprinkle the top generously with the white star confetti sprinkles. This is your chance to get creative and make them look as festive as possible! Continue this process until all your Oreo balls are dipped and decorated.
Once all your Patriotic Oreo Balls are dipped and sprinkled, you’ll want to let them set completely. You can leave them at room temperature for about an hour, or to speed up the process, pop the baking sheet back into the refrigerator for about 15-20 minutes. The candy coating should be firm and dry to the touch before you attempt to move them. Store your finished treats in an airtight container at room temperature for up to a week. These Patriotic Oreo Balls are a delightful way to add a touch of festive flair and sweetness to any celebration. Enjoy!

Conclusion:
And there you have it! Our Patriotic Oreo Balls are not just a delightful treat, they’re a show-stopping addition to any celebration, especially those honoring our nation. These no-bake wonders are incredibly easy to whip up, making them perfect for busy bakers or a fun activity with kids. The combination of classic Oreo flavor with creamy cheesecake and a festive coating is simply irresistible. They’re guaranteed to be a hit at BBQs, fireworks displays, or any gathering where a touch of red, white, and blue is called for.
For serving, consider presenting them on a tiered platter alongside other patriotic desserts. They also make fantastic party favors when placed in small cellophane bags tied with ribbon. Don’t be afraid to experiment with variations! You could try using different colored Oreos for a unique look, or even adding a pinch of peppermint extract to the filling for a refreshing twist. The possibilities are endless!
I truly encourage you to give these Patriotic Oreo Balls a try. They are a delicious and easy way to bring some festive cheer to your table. Happy baking, and enjoy!
Frequently Asked Questions:
Can I make these ahead of time?
Absolutely! Patriotic Oreo Balls are fantastic for making ahead. You can store them in an airtight container in the refrigerator for up to a week. This makes them incredibly convenient for party planning!
What other toppings can I use?
The fun of these treats is their versatility! Besides sprinkles, you could dip them in white chocolate and then drizzle with red and blue candy melts. Crushed nuts, edible glitter, or even finely chopped patriotic candy would also be delicious additions.
How should I store leftover Patriotic Oreo Balls?
Leftovers should be stored in an airtight container in the refrigerator. This will help them maintain their shape and freshness. They will typically last for about a week when stored properly.
Patriotic Oreo Balls
Festive and easy-to-make Oreo balls decorated with red, white, and blue candy melts and white star sprinkles, perfect for any patriotic celebration.
Ingredients
-
1 lb 2.12 oz Family Size package Oreo Cookies
-
8 ounce block cream cheese (softened to room temperature)
-
12 ounce bag red candy melts
-
12 ounce bag blue candy melts
-
⅓ cup Ghirardelli white melting wafers
-
White star confetti sprinkles for topping
Instructions
-
Step 1
Line a baking sheet with parchment paper. -
Step 2
Crush the Oreo cookies into fine crumbs using a food processor or by placing them in a sealed bag and crushing with a rolling pin. -
Step 3
In a medium bowl, combine the Oreo crumbs and softened cream cheese. Mix until well combined and the mixture holds together when squeezed. -
Step 4
Roll the mixture into 1-inch balls and place them on the prepared baking sheet. -
Step 5
Melt the red candy melts and blue candy melts separately in microwave-safe bowls in 30-second intervals, stirring in between, until smooth. -
Step 6
Dip each Oreo ball into the melted red or blue candy melts, ensuring it is fully coated. Place back on the parchment-lined baking sheet. -
Step 7
Melt the Ghirardelli white melting wafers according to package directions. Drizzle the white chocolate over the dipped Oreo balls. -
Step 8
While the coating is still wet, sprinkle with white star confetti sprinkles. -
Step 9
Allow the candy melts to set completely before serving.
Important Information
Nutrition Facts (Per Serving)
It is important to consider this information as approximate and not to use it as definitive health advice.
Allergy Information
Please check ingredients for potential allergens and consult a health professional if in doubt.